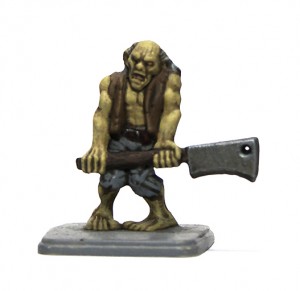
All the Zombies are now finished, very easy to paint with a surprising amount of detail, I’m quite pleased with the result. Now that all the undead are done, I think I shall paint one of the heroes before moving on to the evil side again.
 I have recently bought Zombicide which frankly comes with loads of zombie miniatures so I wanted to try a quick way of painting them, so for this zombie I tried Army Painters Quickshade dips for the first time, I’m quite impressed with it but it does take a long time to dry and leaves the figure a high gloss unless it’s matt varnished at the end.
Painting Guide
When using Quickshade It’s best to paint all the base coat colours and then apply by brush the Army Painter Dark Tone Quickshade all over the model. This made the model very glossy and it took 16 hours to dry but I expected that.
The zombies Skin was painted with Dead Flesh then shaded, I then highlighted the skin with Dead Flesh again.
I painted the eyes and teeth Desert Yellow, followed by a Umber Wash on just the teeth.
The hair was base coated Cold Grey, shaded with Quickshade, highlighted with Stonewall Grey and then given a Sepia Wash to add a little colour.
The Zombies waistcoat was base coated with Heavy Brown before applying the Quickshade, after drying a Heavy Brown highlight then finally a Heavy Brown and Bleached Bone equal mix for the extreme highlight.
Trousers are base coated with Cold Grey, shaded Quickshade and then a Cold Grey highlight. The belt is Charred Brown, Quickshade, then highlighted with Dark Fleshtone. The buckle is painted with Gunmetal and Umber Wash.
The Zombies cleaver was painted with Gunmetal, Quickshade, then just a Gunmetal highlight on the edges. The handle is Charred Brown, Quickshade then an Earth highlight.
The entire model was finally varnished with Army Painter Anti Shine Matt Varnish, which removed all the gloss from the Quickshade.
